Dependency Injection and IOC (Inversion of Control) – C# Example
What is Dependency Injection and IOC?
Dependency injection (DI) and inversion of control (IOC) are actually different things but both go hand in hand. Often when referring to DI, it usually entails IOC as well. DI is a very useful design pattern that aims to decouple the object dependencies. There are a few different ways to implement DI, like via attributes or passed in from object constructors. In this article we will focus on DI via constructors as this is the most common method of dependency injection.
Coupled Dependency
Lets take a look at an object coupled with another object. Consider object A, this now needs to call a function that's declared in object B. So object A creates a new instance of object B.
Note: Coupled dependency usually uses the 'new' keyword.
Example A - coupled dependency
public class A
{
   public bool DoSomething()
   {
      var objectB = new B();
      var result = objectB.DoSomethingElse();
      return result;
   }
}

public class B
{
   public bool DoSomethingElse()
   {
      return true;
   }
}
In the above example within object A, a new instance of object B has been created. As there is nothing actually wrong from a syntax point of view, the program will build, compile and run fine, performing its task as it should. When starting out learning to code the above method is what you will most likely learn.
So why do we need to decouple object B from object A then?
Because there are far more benefits using the dependency injection pattern, some of these benefits includes:
- Easier unit testing
- Easier code maintenance
- Flexibility
we will go a bit further into these later.
De-coupled Dependency using Dependency Injection DI
After looking at the coupled dependency example above, lets now write the same implementation using DI.
public class A
{
   private B _objectB;

   public A(B objectB)
   {
      _objectB = objectB;
   }

   public bool DoSomething()
   {
      var result = _objectB.DoSomethingElse();
      return result;
   }
}

public class B
{
   public bool DoSomethingElse()
   {
      return true;
   }
}
As you can see from the above example the instance of objectB is being passed into A's constructor and assigning it to a private variable for use within the object. The creating on object B now happens outside of object A. Injecting concrete class implementations is fine and can be done but typically you would use interfaces with the objects that you want to inject. All IOC containers recommend registering dependencies with interfaces. Lets use the recommended method using interfaces.
public class A
{
   private IB _objectB;
   public A(IB objectB)
   {
      _objectB = objectB;
   }
   public bool DoSomething()
   {
      var result = _objectB.DoSomethingElse();
      return result;
   }
}

public class B : IB
{
   public bool DoSomethingElse()
   {
      return true;
   }
}

public interface IB
{
   public bool DoSomethingElse();
}
Lets now address the benefits of the DI pattern using the above example:
- Easier unit testing - When you write a unit test, you can now pass in a mocked object B. (More on unit testing specifics as its outside the scope of this article). the test now allows you to test only object A. In the coupled example, when you write a test you are essentially testing object A and object B because they are tightly tied together.
- Easier code maintenance - This really helps when using IOC, and registering dependencies. Imagine you created 20 new instances of class 'B', but now you want to pass a parameter to class B's constructor. So now you have to find every new instance of class B and update it as the app will now fail to build. eg instead of 'new B()' now becomes 'new B(param)'. With IOC all you need to do is make the change in one place and make sure the new dependency is registered.
- Flexibility - The use of interfaces make it much more flexible than injecting concrete implementations. This make it easier to swap out the class 'B' to any other class that implements interface 'IB'. If using IOC all you need to do is change the registered dependency in one place and it changes it for all implantations of 'IB'
The above is a very basic overview of some of the benefits of using Dependency Injection, and you will see for yourself when you start using the pattern.
IOC - Inversion of control
Inversion of control is very useful feature and is nearly always used in every implementation of dependency injection. But you don't need to use one and do this manually. IOC takes control to create the required dependency when required. All that is required is to make sure the dependencies are registered with the correct scope.
In this article, the examples will be using C# .net 5 web API project. This is because DI and IOC works nicely with Web API and MVC project types. This is because from .net core these have been incorporated and it is easy to use and get started with. However there are other IOC containers available and can be used with .net Framework.
Some of these alternatives are:
- Simple Injector -https://simpleinjector.org/
- Tiny IOC - https://discoverdot.net/projects/tiny-ioc
- Castle Windsor - http://www.castleproject.org/projects/windsor/
- Ninject - http://www.ninject.org/
- Autofac - https://github.com/autofac/Autofac
- StructureMap - https://structuremap.github.io/
If you were to implement or try any of the above IOC containers, Simple injector is one of my favourites due to its light weight and easy to use and set up(My Personal Opinion), that's not to say don't use any of the others as they are all quite popular. Please take a look at all of them and use the one you feel most comfortable with.
Dependency Injection example in a .net 5 web API project
We are going to use C# .net 5 web API project for this tutorial, this is because mainly .net framework wont pass version 4.8 and will no longer get feature updates, only security updates at the moment. All new C# projects should ideally use at least .net 5 (.net 6 was released at time of writing). From .net core, Microsoft's IOC container has been integrated into the framework by default, others can be used if desired, but for this we will use the default as its suitable in most cases.
A little info about what an IOC container actually does. It simply takes control of object creation for you and creates the object when needed. In a Web API or MVC project, this is automatically resolved and injected directly into the controllers constructor.
Firstly create a new .net 5 web Api project. The default file structure should look a bit like this:
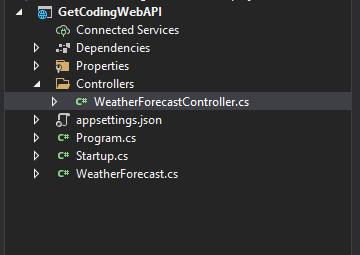
If you navigate and open WeatherForcastController.cs and you can see by default an instance of ILogger is injected in via the constructor.

What we are going to do is create an object to be injected and register the dependency. I am going to refactor the current default code to be injected into the controller.
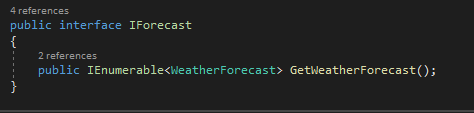
Create a solution folder called 'DependencyInjection', within this folder create two new files, 'IForecast.cs' and 'Forecast.cs'. IForecast is the interface defining a method called 'GetWeatherForecast' and Forecast implementes the interface.
The folder structure should now look something like this:

IForecast interface should look something like this:
and the Forecast implementation will implement the above interface and have the logic moved from WeatherForecastController into Forecast class.
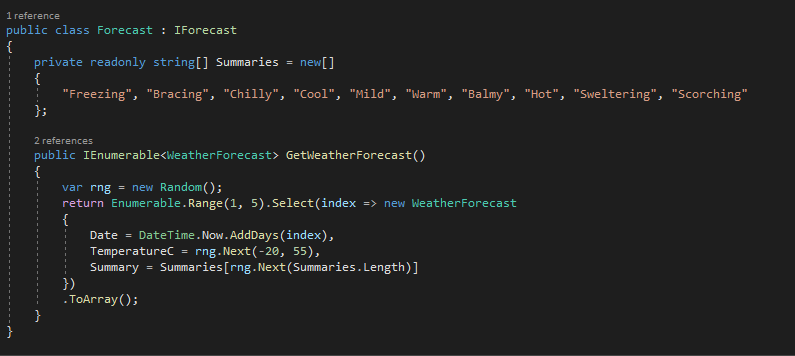
As you can now see that the logic has now been moved into its own class, and implements the 'IForecast' interface. NOTE: all interface definitions must be implemented. The concrete class and interface has now been created and ready to be injected into the 'WeatherForecastController'. After that we will need to register 'IForecast' and 'Forecast' with the Dependency Injection container (IOC).
Inject Dependency
Injecting a dependency is really quite straight forward. We want to inject this into a controllers constructor. First we need to create a private read only interface variable.
private readonly IForecast _forecast;
Now we need to pass in the dependency and assign it to the '_forecast' variable from within the constructor.
public WeatherForecastController(ILogger<WeatherForecastController> logger, IForecast forecast)
{
   _logger = logger;
   _forecast = forecast;
}
All we need to do now is call the function defined in the interface.
var results = _forecast.GetWeatherForecast();
The var type is 'IEnumerable<WeatherForecast>' because that is what is returned by the function.
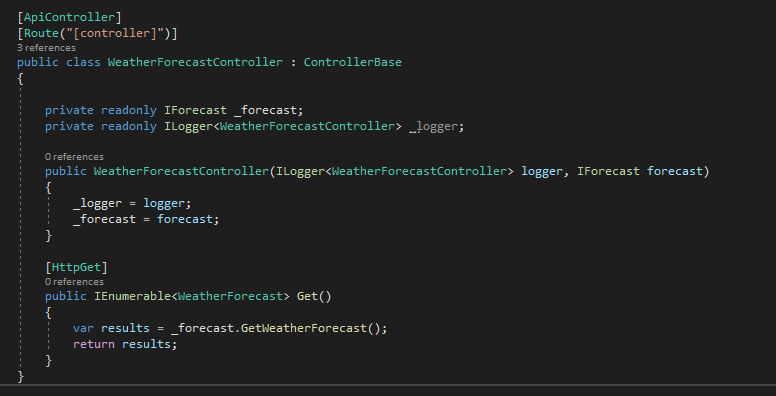
So lets have a look at the refactored controller now. it should look like this:
This part is now complete, now we need to register the dependency.
NOTE: This code will compile, but it will not run. This will throw an error.

Register Dependencies
Because we are using .net 5, it is very easy and straight forward to register dependencies. We need to do this in one place. Dependencies are registered in 'Startup.cs' within 'ConfigureServices' function.
Before we can register the dependency, you need to understand lifetimes, sometimes referred to as lifestyles. There are 3 main lifestyles and these are:
- Transient - new instance created every time it is requested, even if requested multiple times in same HTTP request.
- Scoped - single instance per scope. EG if requested multiple times in a single HTTP request, one instance is created.
- Singleton - single instance for the lifetime of the application.
The most common lifestyle is Transient and is a good start because most of the time Transient is suitable. The following image shows the lifestyles really well, so I thought its best to show you because understanding these lifetimes helps you use the correct one.
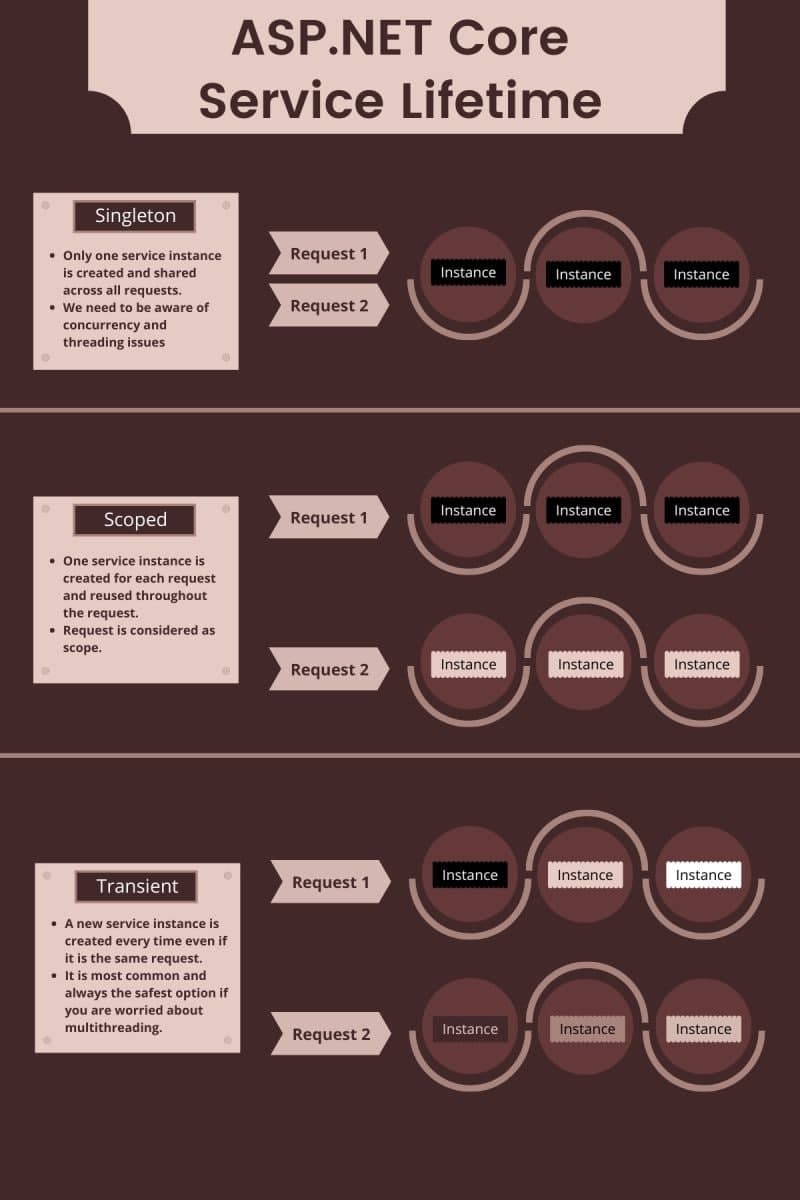
original image from https://www.ezzylearning.net/tutorial/asp-net-core-service-lifetimes-infographic
Now we know what lifestyle's/lifetime's are we can implement them. The syntax is:
services.AddTransient<IForecast, Forecast>();
services.AddScoped<IForecast, Forecast>();
services.AddSingleton<IForecast, Forecast>();
The line of code that we want to use is:
services.AddTransient<IForecast, Forecast>();
Your Startup.cs file, Configure services should now look like this:

Once this line has been added. You have now successfully implemented the DI and IOC pattern in .net 5 and you are ready to go.
NOTE: This will also be the same for .net core 3.1
Thanks for reading!
Please feel free to leave comments.
Leave a Reply